Pixel Art Resolution Guide
How to Choose the Right Resolution
The first decision in pixel art is "what size should I draw at?" This guide covers how to choose the right resolution, proper scaling techniques, and platform-specific size recommendations.


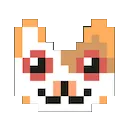
The same pixel art looks different depending on resolution and scaling
Why Does Resolution Matter?
Resolution (canvas size) is the most fundamental factor that determines the direction of your pixel art. Smaller resolutions make each pixel more valuable, leading to abstract and symbolic expressions. Larger resolutions allow more detail, enabling more realistic representations.
Choosing the right resolution helps reduce production time, maintain visual consistency, and achieve the expression you want. Picking the wrong resolution can lead to burnout mid-project or unexpected results.
Recommended Resolutions by Use Case
The table below shows the characteristics and ideal use cases for each resolution.
| Resolution | Use Cases & Features | Level |
|---|---|---|
| 8x8 | Icons, emojis, minimal art challenges. The ultimate constraint art with only 64 pixels. Perfect for social media emojis and small UI icons. | Beginner |
| 16x16 | Classic game sprites, standard starter size. Perfect for retro NES-style characters and items. The most widely used pixel art size. | Beginner |
| 32x32 | Detailed characters, RPG sprites. Enough room for facial expressions and equipment details. Close to SNES-era game graphics. | Intermediate |
| 48x48 | Portraits, detailed items. A great size for character faces and complex objects. Allows distinguishable equipment. | Intermediate |
| 64x64 | Complex scenes, backgrounds, detailed art. Good for landscapes, buildings, and compositions with many elements. | Intermediate |
| 128x128+ | Large illustrations, poster-style art. Painting-like expressiveness while still being pixel art. Takes longer but produces highly polished works. | Advanced |
Grid size comparison across resolutions (actual pixel count comparison)
When in doubt, start with 16x16. It's small enough to finish quickly, and you'll naturally learn core pixel art techniques (limited colors, importance of each pixel). Step up to 32x32 once you're comfortable.
How to Scale Pixel Art Properly
When displaying pixel art at larger sizes, using the wrong scaling method can ruin the crisp pixel look. Here's how to scale properly and common mistakes to avoid.
Nearest-Neighbor vs Bilinear Interpolation
There are two main image scaling algorithms. For pixel art, nearest-neighbor interpolation is the absolute rule.
Crisp pixel edges. Maintains the sharp, distinctive pixel art look.
Pixels are blurred by interpolation. Good for photos, but terrible for pixel art.
Always scale by integer multiples (2x, 3x, 4x...). Non-integer scaling like 1.5x or 2.7x causes uneven pixel sizes, resulting in a jagged, inconsistent appearance.
CSS Settings
When displaying pixel art on websites, set the following CSS properties.
.pixel-art {
image-rendering: pixelated;
image-rendering: -moz-crisp-edges;
-ms-interpolation-mode: nearest-neighbor;
}
Game Engine Settings
When using game engines, you also need to configure texture filtering settings.
- Unity — Set texture Filter Mode to Point (no filter)
- Godot — Turn off Filter in texture Import settings
- RPG Maker — Uses nearest-neighbor by default. No special settings needed
- GameMaker — Set sprite Interpolation Colors to off
Recommended Sizes by Platform
The final output size depends on where you'll use your pixel art. Scale up your original pixel art by integer multiples to match each platform's recommended size.
Social Media Avatars
- Twitter/X: 400x400px → 16x16 at 25x or 32x32 at 12x
- Discord: 128x128px → 16x16 at 8x or 32x32 at 4x
- YouTube: 800x800px → 32x32 at 25x
Game Assets
- 2D Action: 16x16 or 32x32 as sprite base
- RPG: 16x16 (map tiles), 32x32-48x48 (characters)
- Tower Defense: 16x16-32x32 (units)
- Backgrounds: 256x144 to 320x180 is common
Digital Art / NFT
- NFT Collections: 24x24 to 32x32 is standard (CryptoPunks style)
- 1/1 Art: Create at 64x64-128x128, then scale up for output
- Final output: 1000x1000px+ recommended
When posting on social media, save in PNG format. JPEG compression blurs pixels. With Pixnote Editor Lite, you can export your pixel art directly as PNG.
Common Mistakes and How to Avoid Them
Beginners starting at 128x128 or 256x256 often give up because there are too many pixels to fill. Pixel count grows quadratically -- 32x32 (1,024px) vs 128x128 (16,384px) means 16 times more work.
→ Solution: Start at 16x16 or 32x32, then scale up as you improve
Mixing 16x16 characters with 64x64 backgrounds in game assets creates a jarring mismatch in pixel density. Keep resolution consistent within the same scene.
→ Solution: Decide on a base resolution at the start of your project and keep all assets consistent
Default scaling in image editors and web browsers uses bilinear interpolation (designed for photos), which blurs pixel art when scaled up.
→ Solution: Always use nearest-neighbor scaling. In CSS, set image-rendering: pixelated
Scaling at 2.5x instead of 3x makes some pixels larger than others, breaking grid consistency and creating a jagged appearance.
→ Solution: Always scale by integer multiples (2x, 3x, 4x, 5x...)
Resolution Selection Checklist
Before choosing a resolution, check these points.
- What are you drawing? — Small for icons, large for scenes
- Where will it be used? — Check if it's for social media, games, print, etc.
- What's your skill level? — Beginners should start small
- How much time do you have? — Larger = more time needed
- Is it consistent with other assets? — Keep it uniform across your project
There's no single "correct" resolution for pixel art. What matters is choosing a size that fits your purpose and scaling it correctly. Start with a small canvas and gradually work your way up to larger sizes.
Start Drawing Now
With Pixnote Editor Lite, draw pixel art in any size from 8x8 to 64x64. Just open your browser and start creating.
Open Editor Lite →