Creating Pixel Art Game Assets
Characters, Tiles & UI
Pixel art assets are essential for indie game development. Learn how to create characters, backgrounds, UI elements, and items — organized by asset type.

Characters, backgrounds, effects — a unified palette builds the world
Before You Start Creating
Before jumping in, decide on the following. Setting consistent rules for your assets greatly affects the overall look of your game.
- Base Grid Size — 16x16, 32x32, 48x48, etc. Keep this consistent across all assets
- Color Palette — Using a shared palette across the entire game creates visual consistency
- Light Source Direction — Upper-left is standard. Keep consistent across all assets
- Outline Style — Choose one: black outline, colored outline, or no outline — and stick with it
"Consistency" is the most important rule for game pixel art. Rather than individual asset quality, it's the overall visual cohesion that makes work look professional.
Character Sprites
Player characters, NPCs, enemies — the pixel art for your game's characters.
Size Guidelines
- 16x16 — Simple top-down RPGs or small characters
- 32x32 — Most versatile. 2D action, RPG, platformers
- 48x48〜64x64 — Detailed characters. Fighting games and visual novels
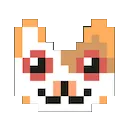
Character sprite example (128x128)
Character Creation Tips
- Design for silhouette recognition (characters should be identifiable even without color)
- Use 2-3 head-to-body ratio. Larger heads give a cute pixel art feel
- Limit to about 6-12 colors per character
- Use the most eye-catching colors on important parts (face, weapon)
Map Tiles
Tiles for tilemaps that make up your game's backgrounds and stages. The key is making them look natural when repeated.
Basic Tile Types
Ground Tiles
Grass, dirt, cobblestone, sand, etc. Draw them "seamless" so edges connect naturally.
Wall & Obstacle Tiles
Brick walls, rocks, fences. Make impassable areas visually clear.
Decoration Tiles
Flowers, signs, lamps. Add personality and visual interest to maps.
Transition Tiles
Grass-to-sand, path-to-grass borders. Essential for natural transitions.
When creating tiles, always test them tiled together. What looks good alone may show obvious patterns when repeated. Add subtle randomness or create several variations for a natural look.
Items & Objects
Weapons, armor, healing items, treasure chests, keys — objects used within the game.
- Usually 16x16. Easy to use in inventory displays too
- When used as icons, make them recognizable even at small sizes
- Express rarity through color (copper → silver → gold → rainbow)
- Derive items in the same category from a shared template for consistency


Small 16-32px icons are a strength of pixel art
UI Icons & Fonts
HP bars, buttons, menu backgrounds, status icons — interface elements displayed on screen.
UI Asset Tips
- Create resizable panels with 9-slice technique for any size
- Custom bitmap fonts at 5x5 to 8x8 pixels add authentic retro charm
- Design status icons to be meaningful from silhouette alone
- Choose UI colors that don't clash with game screen colors for readability
Export & Implementation Tips
- Export as PNG (supports transparency, no quality loss)
- When scaling up, use "nearest neighbor" interpolation to keep pixels sharp
- Group same-type assets into sprite sheets for easier management
- Use consistent naming conventions (e.g., char_hero_idle_01.png)
Major game engines (Unity, Godot, RPG Maker, etc.) can import PNG pixel art directly. Save your Pixnote creations as PNG and they're ready for your game.
Recommended Workflow
- Define your color palette (shared across the entire game)
- Draw the player character first (to confirm base size)
- Create 5-6 basic map tiles
- Build a test map to check overall balance
- Add items and UI elements
- Adjust based on feedback
Start Creating Game Assets
With Pixnote, start creating game-ready pixel art assets right in your browser. PNG export supported.
Open Editor Lite →